Tuesday, March 9, 2021

Ready to Rock

 New system is done!  (or at least done enough to brew on).  First brew day is set for 3/14.  Ran a mock water brew on it this past weekend checked for any final leaks and all went really well.  


Thursday, February 25, 2021

Mash Tun on the way

 Finally got notification from SSBrewtech that my Mashtun is back in stock.  Quickly ordered and it should be on its way here soon to complete the system


Wednesday, February 24, 2021

Design change

So the inability to whirlpool through my chiller has been bugging me for a couple reasons.

  • I won't be able to drop temp quickly to get to whirlpool temp (170 degrees or so) 
  • I won't be able to chill back into my boil kettle to drop cold break in my kettle 
  • I wont be able to sanitize my chiller by circulating boiling wort through the chiller
The last one was probably my larger concern.  Having come this far in this build I decided I didn't want to make these compromises.  I have made some changes to be able to solve these problems.  Essentially this involves a few more three way valves 

Now I can run 
  • From the boil kettle through the chiller back to the boil.
  • From the boil kettle bypass the chiller back to the boil.
  • From the boil kettle through the chiller to the fermenter
Here are the new drawings as well as a picture of the new valves in place.


Tuesday, February 16, 2021

 An update on my build.

Parts have started to arrive and I have been busy assembling.  The one big piece I'm missing (because it is out of stock) is my mash tun from SSBrewTech.  Im hoping it comes in this week.  I was able to put most of the rest of this together.


I was able to run some leak tests which showed a few things that needed correcting.  I also ran a few tests on the boil kettle.  Looks like I should be able to expect a 3 degree rise per minute on a 12 gallon boil which seems pretty good.  I did have to change the design a bit as I found out that my chiller restricts the flow too much to get an effective whirlpool.  So I modified the design to have the whirlpool branch off before the chiller (instead of after).  Im a little worried that that will mean any cold break material will end up in the fermenter but I think that will be a try it out and see if that is a problem I need to fix down the road


Tuesday, February 9, 2021

New System (Theory)


 Getting back into brewing the main thing I wanted to do is make good quality and more importantly repeatable beer.  My process before was ok and I made good beer (even won a few metals) but it was never repeatable.  I could brew the same recipe multiple times and it was never exactly the same and sometimes wildly different.  

My issue with my old process was control.  I was able to control some things and not others just too many variables on brew day to reliably make the same beer twice.  So having a bit of extra cash laying around I wanted to solve that problem this time around.  I decided on an all electric system based around SS BrewTech equipment.   I went back and forth on numerous systems and manufactures but eventually settled on SS BrewTech mainly because I really liked their mash tun (insulated with a bottom drain).

So once I settled on the what manufacture I was going to get the system from I started on the design.  Here I made a slight departure from the traditional three vessel approach.  I decide on a two vessel no sparge design for a couple reasons mainly space and simplicity.  I fully realize I will take a hit on my efficiency but efficiency is not my real goal here.  As long as I get reasonable efficiency (around 70%) and more importantly it is repeatable I'm happy

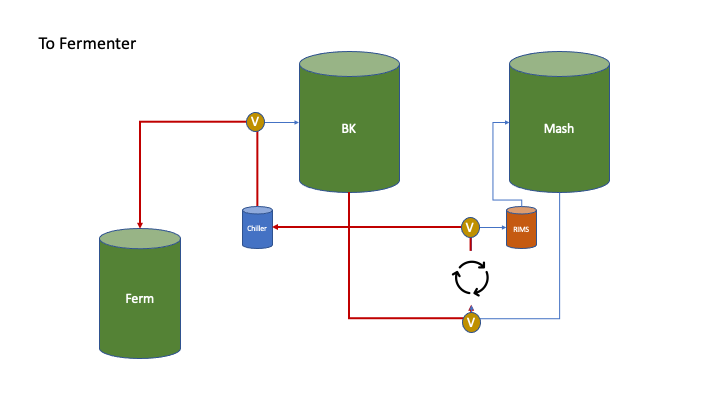
So here is the general flow of the design

    1. Cold water into the boil kettle, heat to strike temp

    2. Transfer to mash tun and dough in

    3. Recirculate during mash through RIMS to maintain and control temp

    4. Transfer (full volume mash) back to boil kettle 

    5. After boil Whirlpool through chiller

    6 Transfer chilled wort to fermenter

here are the illustrations of the steps


Monday, February 8, 2021

Long Time

It has been quite a long time and honestly I was a little surprised this was still up.  I took a break from brewing for a couple years but since I'm mainly stuck in my house these days decided to pick it back up.  Im building a completely new electric system which I will detail here soon.  I may have gotten a bit overexcited about this new build and got slightly overboard but I will try and get some pictures up here soon.... stay tuned

Tuesday, October 2, 2012

Pumpkin Porter Brew Day

It has been a couple weeks since I posted.  I apologize for the delay but I took a wonderful vacation with my family.  Once I got back and settled, I started on the Pumpkin Porter that you all voted for and you can see the recipe here.  There were a couple of modifications, most notably I used 58oz of pumpkin as it came in 29oz cans.  I figured that this was close enough to the 60oz that I called for in the original recipe.  Also I was able to get some great local and organic cascade hops that I wanted to use so I substituted them in.  Here is how my bred day went.


Pumpkin Porter Brew Day
The first part of the process for me was to roast the pumpkin.  I spread the two cans of pumpkin out on a backing sheet and placed it in a 400 degree oven.  After 45 minutes of my house smelling deliciously of pumpkin I removed the pumpkin and took a look.  To be honest I was looking for more of a roast on top.  The sides and the bottom got a bit roasty but I would have liked some more.  If I was not a little pressed for time I would have put it back in on broil to increase the roasty character but I really had to get this brew done.

After the pumpkin was done I brought 2.5 gallons of water to 150 and began to steep my grains.  Thirty minutes later I had some nice dark and roasty wort that smelled fantastic.  I cranked up the heat and added my 7lbs of light malt extract slowly while stirring.  Next came the pumpkin.  This was my first time using pumpkin an I have to say it took a bit of work to get it to incorporate well.  It tended to stay all globed up.  The best method I found was to mush the globs with the back of the spoon on the side of the pot to break them up.

Once the boil started I added 1oz Kent Golding pellet hops and continued the boil for another 45 minutes.  At the 15 minute mark I added 1oz of the organic hole leaf Cascades and 1Tsp of pumpkin pie spice.  After some further reading I should have added the spice later possibly at flame out to get the most out of the spices but I can always add more in the secondary if it needs it.  The last hop addition was another 1oz of the leaf Cascades at the 5 minute mark.

The wort was chilled and transferred to the fermenter where the additional 2.5 gallons of water were waiting.  After a quick stir I pulled a sample for a gravity reading and taste.  The gravity reading came out a little higher than expected at 1.059 vs the expected value of 1.056.  I was expecting this as ibrewmaster did not adjust the gravity to account for the additional sugars in the pumpkin.  The wort tasted pretty darn good, obviously very sweet, but with a nice pumpkin and spice flavor.  I have good hopes that this will turn out pretty well and my become my annual fall beer.  I will update more on the as it progresses and let you know how it turns out.